Dashboard Overview & Main Navigation
Complete visual guide to the PistioAI store dashboard, navigation sidebar, quick launchers, and analytics overview.
Overview
🖼️Visual Interface Guide
Step-by-Step Instructions
1Left Navigation Sidebar
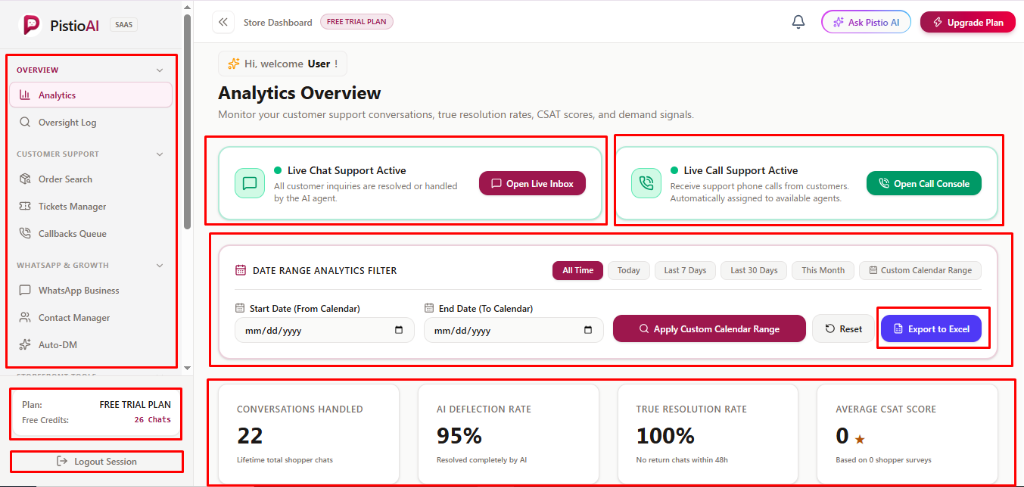
Use the left menu to navigate between your operational tools. It is organized into clear sections: 'Overview' (Analytics, Oversight Log), 'Customer Support' (Order Search, Tickets Manager, Callbacks Queue), and 'WhatsApp & Growth' (WhatsApp Business, Contact Manager, Auto-DM).
2Plan & Free Credits Monitor
Located at the bottom of the left sidebar, this box displays your store's active subscription tier (e.g. 'FREE TRIAL PLAN') along with your remaining free chat balance (e.g. '26 Chats'). It helps you monitor your usage so you know when to upgrade.
3Logout Session Button
Located at the very bottom-left of the screen, click 'Logout Session' to securely sign out of your account when your shift ends.
4Live Chat Support Active Card
Shows a green active badge confirming that automated AI web chat is running on your website. Click 'Open Live Inbox' to immediately access the team inbox, view conversations, and take over chats manually if needed.
5Live Call Support Active Card
Indicates that voice calling support is online and incoming customer phone calls are being received. Click 'Open Call Console' to open your phone console, manage outbound calls, and check call logs.
6Date Range Analytics Filter & Export
Filter all dashboard metrics using quick presets ('All Time', 'Today', 'Last 7 Days', 'Last 30 Days', 'This Month') or pick custom dates using 'Start Date' and 'End Date' pickers. Click 'Export to Excel' to download your full conversation and performance history as a spreadsheet.
7Key Performance Indicator (KPI) Cards
Four real-time metric cards at the center of the dashboard show: 'Conversations Handled' (total shopper chats), 'AI Deflection Rate' (% of chats resolved by AI with no human agent needed), 'True Resolution Rate' (% of issues resolved without a return chat in 48 hours), and 'Average CSAT Score' (customer satisfaction rating out of 5 stars).
8Top Header Actions & AI Assistant
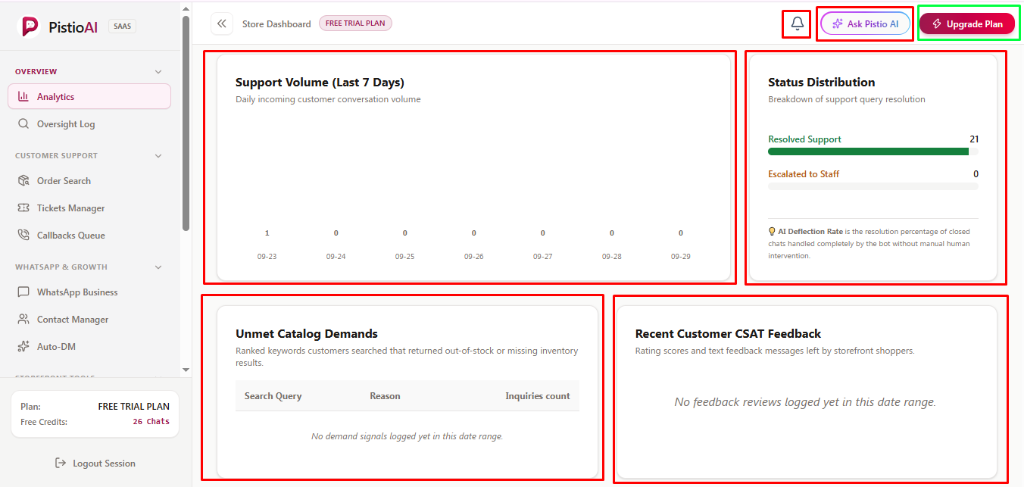
In the top-right header, click the Bell icon to view system alerts and escalations. Click 'Ask Pistio AI' to ask any question about the platform, or click 'Upgrade Plan' to add credits and unlock premium features.
9Support Volume & Status Distribution Charts
View the 'Support Volume (Last 7 Days)' chart to spot daily chat traffic patterns. The 'Status Distribution' panel shows the split between tickets resolved by AI versus those escalated to human staff.
10Unmet Catalog Demands & CSAT Feedback
The 'Unmet Catalog Demands' table highlights out-of-stock or missing products shoppers searched for during chats. The 'Recent Customer CSAT Feedback' feed displays live customer reviews and satisfaction ratings.
💡Pro Tips & Best Practices
- •Check your 'Free Credits' counter regularly so customer inquiries are never paused due to quota exhaustion.
- •Use 'Export to Excel' at the end of every week to share support performance reports with your management team.